OK Thank You for sticking with me thus far.
If you still find you are not connecting to WiFi here is a wpa_supplicant.conf template file I know works. Just copy/paste it into a new wpa_supplicant.conf file exactly as it i,s making the necessary changes I’ve outlined below.
At the heading country=XX just replace XX with your country designation code, ie if its the US just put country=US no spaces
At ssid=“xxxxxxxxxxxxxx” just replace the x with your ssid name in between the quotation marks, again no spaces left or right inside the quotation marks.
At psk=“xxxxxxxxxxxxxxxxx” same applies above replacing the x with your psk password this time.
ctrl_interface=DIR=/var/run/wpa_supplicant GROUP=netdev
update_config=1
country=XX
network={
ssid=“xxxxxxxxxxxxxxxxxxx”
psk=“xxxxxxxxxxxxxxxxxx”
key_mgmt=WPA-PSK
}
I have connected it wont accept user pi pass x10user “password denied”
Once you have your Raspberry Pi up and running you will need to open a PuTTY session to access it.
- To config your RPI copy/paste the following into the PuTTY session
sudo raspi-config
Make the necessary changes and follow the on screen instructions to exit
- To set up a source for Mono copy/paste each line individually followed by the Enter key after each line is pasted.
sudo apt install apt-transport-https dirmngr gnupg ca-certificates
sudo apt-key adv --keyserver hkp://keyserver.ubuntu.com:80 --recv-keys 3FA7E0328081BFF6A14DA29AA6A19B38D3D831EF
echo “deb https://download.mono-project.com/repo/debian stable-raspbianbuster main” | sudo tee /etc/apt/sources.list.d/mono-official-stable.list
sudo apt update
- You are now going to install Mono and all the dependencies needed. This is one single line that appears as a block so you need to copy the whole block in one single copy/paste command into the PuTTY command line and press enter.
sudo apt-get install mono-runtime libmono-corlib2.0-cil libmono-system-web4.0-cil libmono-system-numerics4.0-cil libmono-system-serviceprocess4.0-cil libmono-system-data4.0-cil libmono-system-core4.0-cil libmono-system-servicemodel4.0a-cil libmono-windowsbase4.0-cil libmono-system-runtime-serialization-formatters-soap4.0-cil libmono-system-runtime-serialization4.0-cil libmono-system-xml-linq4.0-cil mono-dmcs
- Now we need to install HomeGenie dependencies before we install HomeGenie. Copy/paste each line individually followed by the Enter key after each copy/paste in PuTTY command line.
sudo apt-get install alsa-utils lame
sudo apt-get install libv4l-0
sudo apt-get install libusb-1.0-0 libusb-1.0-0-dev
sudo apt-get install arduino-mk empty-expect
- Finally we will fetch the HomeGenie zip file and uncompress it
wget https://github.com/genielabs/HomeGenie/releases/download/v1.3-stable.5/homegenie_1.3-stable.5.tgz
tar xzvf homegenie_1.3-stable.5.tgz
- In order to start HomeGenie automatically each time we need to create a homeseer.service file
sudo nano /etc/systemd/system/homegenie.service
This brings you into the Raspbian file editor. Just copy/paste the following onto the top line of the screen
[Unit]
Description=Homegenie Server
After=network.target
[Service]
WorkingDirectory=/home/pi/homegenie
ExecStart=/usr/bin/mono /home/pi/homegenie/HomeGenie.exe --log
Restart=always
[Install]
WantedBy=multi-user.target
As soon as you have copy/pasted press the Ctrl-X keys and then press Y and Enter.
- You need to enable the HomeGenie service so copy/paste the following
sudo systemctl enable homegenie.service
Now you need to start the service
sudo systemctl start homegenie.service
You can access HomeGenie in the usual way. It will have been installed on Port 80 as a new install.
Nooooooooo…
This is a fresh install of HomeGenie.Nothing to do with X10 hub
user=pi
password=raspberry
Are you connected to your Raspberry Pi yet. If so after you configure it with your local settings you will need to do the following
sudo apt update
sudo apt upgrade
This will ensure you have the latest software as of today
I did not see your update or upgrade post until I have copy pasted much of your instructions. Can this be done at any Time? I’m as far as 5. downloading HG ver 1.3 stable 5 to my downloads folder and uncompressed with 7 zip. but I’m not sure what the wget means before the website link and tar xzvf homegenie_1.3-stable.5.tgz after the website link.???
These instructions are all carried out in your PuTTY session. Forget about Windows. We are finished with Windows once you have connected to you Raspberry Pi via PuTTY.
The unzipping is done with the tar command.
As I said each line followed as I’ve outlined is copy/pasted into PuTTY command line.
The sudo apt update and upgrade can be done afterwards.
Being in PuTTY is like having a keyboard and screen attached to your Raspberry Pi. As I said we are no longer interested in Windows.
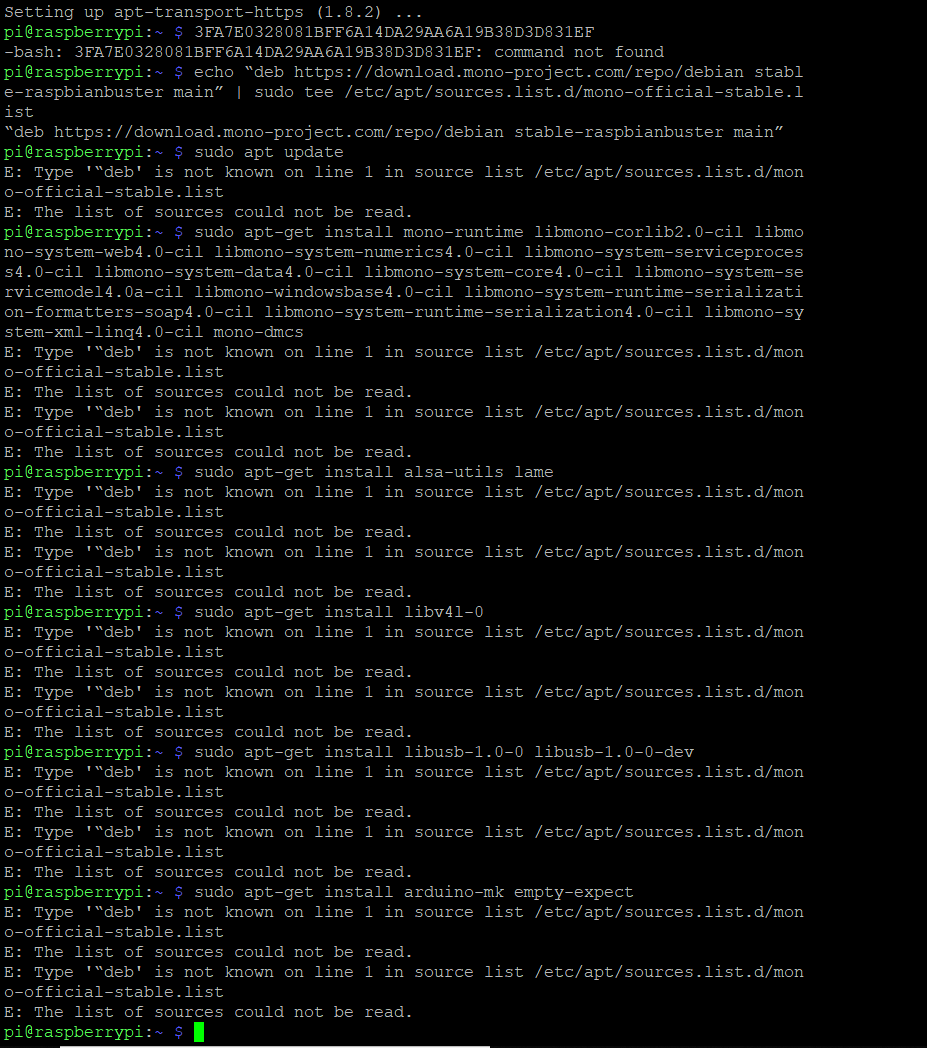
If you look at line 2 of your screen cap that’s not a command and the system is telling you that.
You’ve ploughed ahead which means the rest of the instructions won’t work.
Each line starts with sudo or wget or echo. You need to copy/paste each line/section as I laid out and watch the screen for the output to make sure it is executed correctly.
I suggest you reimage a fresh version of Raspbian Buster onto your SD card and when you are finally connected to your Raspberry Pi via PuTTY come back here and I can walk you through each command as it should be copy/pasted into your PuTY session.
After copy and pasting and press enter key
sudo apt install apt-transport-https dirmngr gnupg ca-certificates. I get message “list of sources could not be read”
Ignore last post this is the correct message I get after copy and pasting sudo apt install apt-transport-https dirmngr gnupg ca-certificates.
E: Type ‘"deb’ is not known on line 1 in source list /ect/apt/sources.list.d/mono-official-stable.list
E: The list of sources could not be read
Thanks. OK I will re image and get back to you.
Ok.
As soon as you have connected to your Raspberry Pi via PuTTY copy/paste this command
sudo raspi-config
This will allow you to configure your local settings. As soon as you have completed this follow the on screen instructions to exit and reboot and report back.
I have completed sudo raspi-config and rebooted
Ok. At the command prompt copy/paste the following commands one at a time. Let the first one execute then copy/paste the second
sudo apt update
sudo apt upgrade
Report back when it’s complete
Update Upgrade successful
Copy/paste the following EXACTLY as it reads here. This is one single command. Report back
sudo apt install apt-transport-https dirmngr gnupg ca-certificates
Apt transport successful